
Okay, real talk: the first time I tried to set up WordPress, I got so frustrated. I had no idea what cPanel was, I didn’t understand the difference between WordPress.com and WordPress.org, and when I accidentally clicked something I didn’t understand, I felt like I wanted to throw everything around me. I questioned myself and worst I questioned God, “is this really something for me or should I just stick to my 8-5 desk job?”
You are not going to have that experience. Because I’m walking you through this, and I’m going to explain every single thing — including the confusing bits that the official WordPress documentation conveniently glosses over.
Here’s what we’re doing today: getting your WordPress blog set up from scratch. Hosting purchased, WordPress installed, theme activated, essential plugins in place. By the end of this post you’ll have a real, live, actual blog on the internet with your name on it.
Let’s go.
First — What Actually Is WordPress?
WordPress is the software that powers your blog — it’s what makes it possible to write posts, add images, organize your content, and make everything look nice. About 43% of all websites on the internet run on WordPress. It is the industry standard. It’s not going anywhere.
Here’s the part that confuses everyone: there are two WordPresses.
- WordPress.com — the free, hosted, limited version. You don’t own your content. You can’t fully customize it. You can’t monetize it properly. We are NOT using this.
- WordPress.org — the self-hosted version that you install on your own hosting. This is what every serious blogger uses. This is what we’re setting up today.
The difference seems small but it is enormous. Always, always, always go with WordPress.org.
Step 1: Buy Your Hosting
Your hosting is basically the land your blog sits on. The domain name is your address, the hosting is the land itself, and WordPress is the house you build on it.
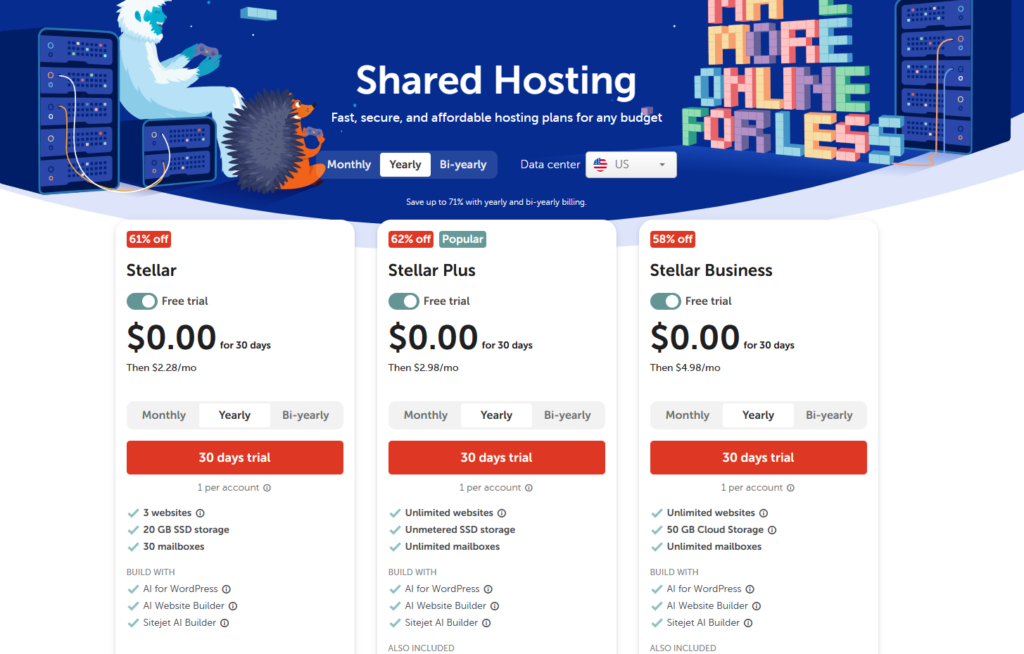
I recommend Namecheap because it’s what I was using, got accustomed to it pretty fast, and it’s genuinely affordable. SiteGround is another great option with better performance if you’re willing to pay a little more.
When you sign up for hosting, you’ll go through a checkout process that looks overwhelming but is actually fine. Choose Stellar plan to start. You can upgrade later when you need to. Don’t buy every add-on they offer — you don’t need them yet.
This month, Namecheap has a 30-day Free Trial so while you are preparing your blog, you get to do it FREE! And when you get the hang of it, you can purchase it at a low price- less than $3/month! What a grab!
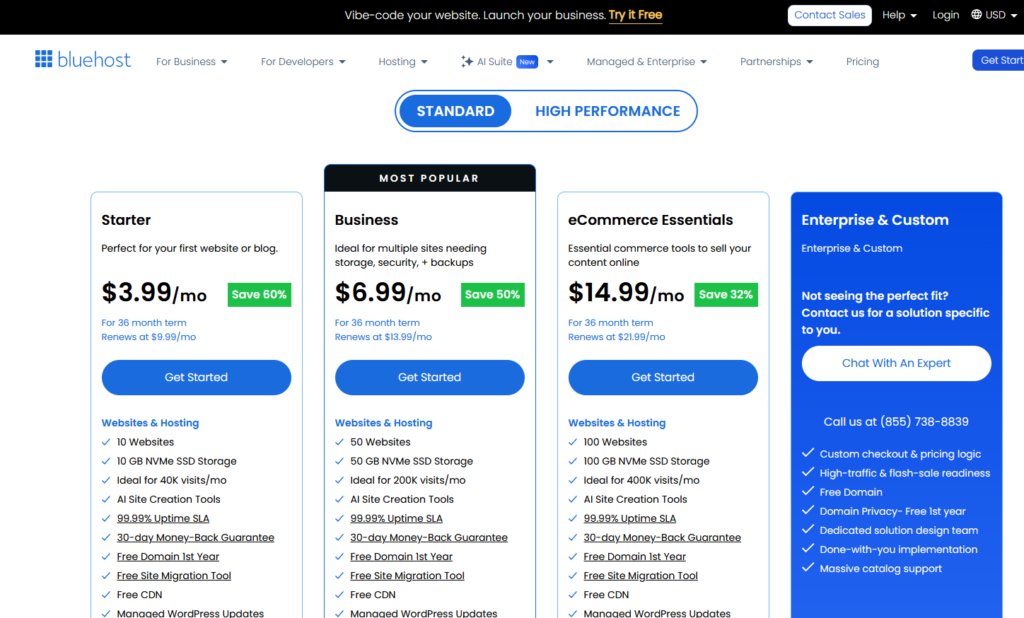
Another web hosting I dipped my toes in and one I’d say is also easy to use and navigate especially for beginners is Bluehost.
Bluehost gives a free 1 year domain when you purchase their web hosting. Really a great deal!
Step 2: Install WordPress
Once you have hosting, log into your hosting dashboard. You’ll see an option somewhere that says ‘Install WordPress’ or ‘WordPress’ under a ‘Website’ section. Click it. Follow the prompts. Put in your site name, create a username and password. Done.
Seriously. That’s it. The one-click install means you don’t have to touch any code. The whole thing takes about three minutes.
Step 3: Log Into Your WordPress Dashboard
Your WordPress dashboard is where you’ll live. Access it by going to yourdomainname.com/wp-admin and logging in with the username and password you just created.
The dashboard looks like a lot at first. Here’s what you actually need to pay attention to:
- Posts — where you write and manage your blog posts
- Pages — where you create your About page, Contact page, etc.
- Appearance — where you install and customize your theme
- Plugins — where you install and manage your plugins
- Settings — where you configure the basics (your site title, timezone, etc.)
Everything else in the sidebar you can safely ignore for now.
Step 4: Install Your Theme
Your theme controls how your blog looks.
Go to Appearance > Themes > Add New and search for ‘Kadence’ or ‘Astra.’
Both are free, fast, and gorgeous. Install one, activate it, and your blog will instantly look less like the default WordPress. Progress!
Don’t spend hours on this. Pick one, activate it, move on. You can style it in more detail later.
Step 5: Install Your 4 Essential Plugins
Go to Plugins > Add New. Search for and install each of these:
- Rank Math SEO — your SEO guide inside WordPress. It shows you a score for each post and tells you exactly how to improve it. Install it, run the Setup Wizard, connect it to Google Search Console.
- LiteSpeed Cache (free) — makes your site load fast. Google gives ranking priority to fast sites. This is not optional.
- Akismet Anti-Spam — automatically filters spam comments. Free for personal blogs.
- MailerLite — connects your email list opt-in forms to your blog. Set this up after you create your email account.
Activate each plugin after installing. Don’t install 20 plugins. Each one you add slows your site down slightly. Only install what you actually need.
This blog you’re reading is also using Elementor but you can keep using the default web builder that is already in WordPress.
For my full website/blog setup, you can sign up to My Tech Stack page so I can share access with you to the document where I constantly update the tools I have.
Step 6: Set Up Your 6 Blog Categories
Go to Posts > Categories and create your six content pillars:
- Faith-Based Blogging & SEO
- Pinterest & Social Media for Faith Brands
- Christian Branding & Design
- AI & Digital Tools for Faith Creators
- Monetizing Your Faith Platform
- Spirit-Led Strategy & Mindset
These categories show up in your navigation and in your Pinterest board structure — so getting them right now sets your whole content architecture in place.
When you create your own categories, think about what exactly you want to share with your audience. Write those down and think of how you will organize these blogs, like what umbrella they fall in.
🙌 You Did It: Your blog is live. It exists in the world. Go to your domain and look at it. Yes, it still needs content. Yes, there’s more to do. But this is the part that most aspiring faith creators never get to. You got here. That matters.

📌 Action Step: Screenshot your live blog homepage. Post it somewhere — your Instagram stories, your personal Facebook, even just in your Notes app. Mark the moment. Then come back next week and we’ll talk about your Pinterest setup.